A Little More Software

I couldn’t resist.  I just had to do some more work on the Web site.  Actually, there was a glaring bug I felt compelled to address.  Instead of playing nice and asking the weather station to supply the weather stats and logs, I was copying them directly from the directory where the weather station software stores them.  I did that for expediency, but it is the wrong way to do things.  The bug was that sometimes the files were copied while the weather station software was in the process of writing them.  This resulted in incomplete files being transferred occasionally.  The correct way was to open a TCP/IP connection to the weather station and ask for the data.  That way the station software could control concurrent access to the data.  Another benefit is that the data returned is in XML format.  One of the log files was being transferred as a binary file.  Having it as XML makes it much easier to parse in PHP.

I wrote a small Java application to connect to the weather station and retrieve the data.  Then I transfer that data to the Web site so that the PHP scripts can parse, format, and display it.  I also made sure that the FTP script copies the files using new names, then deletes and renames the file once they have been transferred successfully.

Next I completed the display of the weather station history information.  That was one of the largest outstanding items left on the Web site to do list.  Not very difficult to program, now that I have the data in XML format.  I also made a few modifications to the pages that use data not generated by the weather station.  I had been using wget in a script running from cron to retrieve that data on a periodic basis.  I modified the PHP scripts that parse that data to retrieve the data on demand and store it locally.  Once the data becomes stale, they retrieve a new copy.  That keeps me from needing the cron script at all, and also prevents the script from retrieving the data too often.

Finally, I created common files for the header, footer, and navigation.  This is something I’ve wanted to do for some time now.  That helps to ensure consistency across all the pages, and makes maintenance a lot easier, as I only need to make changes in one place rather than on each page.  This fix was long overdue, and the reason I didn’t start out this way was that straight HTML doesn’t provide a good mechanism for doing this, and the template I started with didn’t split out these pieces.  Hopefully these changes will make my life easier.  I still need to rewrite some of my astronomy calculations from Java to PHP.  But I really need to get the hardware finished.

FARS

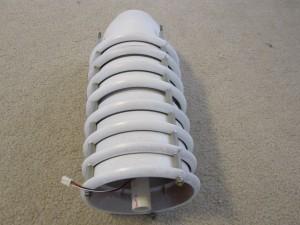
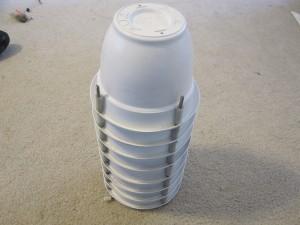
I spent quite a bit of time on my fan aspirated radiation shield today.  It consists of threaded aluminum rods, plastic flower pots (UV resistant), plastic spacers made from tubing, some metal brackets I fabricated, and some assorted hardware and PVC fittings.  Not the prettiest thing to look at, but very functional.

One thing that I’m not very happy with is the paint job.  I used a spray can of white paint formulated for painting plastic.  It didn’t spray evenly.  It tended to spit a lot, and paint dripped out of the nozzle onto my hand and down my arm.  I’ve used spray paint successfully on many occasions, so even if my technique was bad, it isn’t that bad.  My assumption is that this plastic paint behaves differently than regular spray paint, and I wasn’t fully prepared to deal with it.

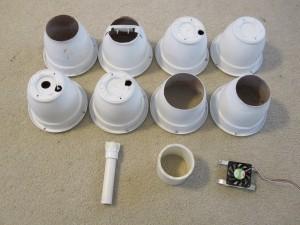
This picture shows the flower pots after I cut the necessary holes in them.  It also shows the base mount, fan and mounting brackets, and a piece of PVC tubing that fits inside the FARS.

FARS Exploded View

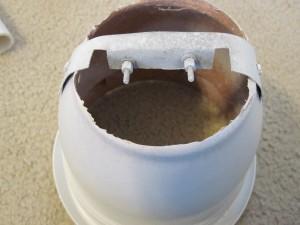
I made a small metal bracket to mount the temperature/humidity board.  There is a PVC tube that fits inside the shield, and the bracket positions the board so that it sits at the top of the PVC tubing.

Humidity/Temperature Board Bracket

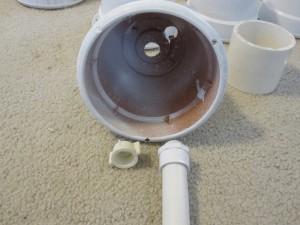
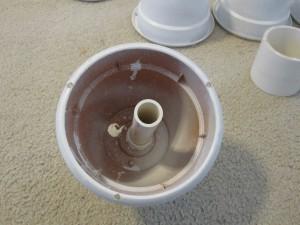
I made a mount for the base out of some PVC plumbing fittings.

Base Mount

Assembled Base Mount

Assembled Base Mount

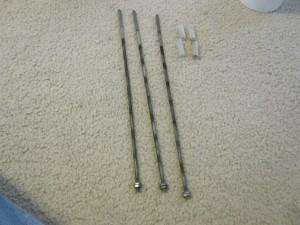
These are the threaded rods and plastic spacers.  I cut the spacers out of some plastic tubing.  The rods are used, so they don’t look very pretty.

Threaded Rods and Spacers

Threaded Rods and Spacers

And here’s what it looks like assembled.

Assembled FARS

Assembled FARS

Assembled FARS - Another view

Assembled FARS - Another view

Back to Hardware

While I enjoy working on the software, it was time to get back to work on the weather station hardware.  Working with indoor readings is useful for debugging, but the whole point is to get this weather station outside and get some real world readings.  It was time to get back to work on the hardware side of things.  The software still needs a lot of work, but it can wait for the hardware to be working properly.

First I wanted to solder the new humidity sensor on the temperature/humidity board.  That meant I needed to peel off all of the liquid electrical tape I had used to weatherproof the board.  That took about an hour of peeling.  That stuff really sticks well.  It even pulled an electrolytic capacitor off of the board when I peeled it off.  Luckily none of the traces came off with it.  It was a simple job to solder that cap back on.  I must not have done such a good job of attaching it the first time.

Next I removed the old humidity sensor from the board and soldered the new humidity sensor on.  I kept careful track of which way the old one was facing so I could get the new one on correctly.  I had soldered the original on backwards when I first built the board, and it doesn’t work at all that way.  I had to remove and re-solder it correctly.  I wasn’t going to make that same mistake twice.  Or so I thought.  After I soldered the sensor on and tested the board, it was completely dead.  It turns out I repeated my old mistake, and soldered the sensor on backwards again.  Once I corrected that mistake the board worked fine.  The humidity in my house no longer reads as 100%.  It’s now 36.25%, which is a lot closer to correct.

I also replaced the photo diode on my solar sensor.  Again, a full hour of peeling off the liquid electrical tape gunk.  At least I managed to solder this part on the right way.  Plugged it in for a test, and it is reacting to the sunlight coming in through the window.  Of course the readings aren’t calibrated to any known scale, so they don’t have a whole lot of meaning.  It just provides a way to compare the relative amount of sunlight at different times of the day and different days of the year.  Maybe one day I’ll try and put together something a bit more accurate.  But for now it works.

Next will be the fan aspirated solar radiation shield.  I’ve already made a lot of progress on it.  Just need to take some pictures and do the write up.  I may also add a picture of he temp/humidity board (with the sensor facing the right direction) and the solar board.

More Web Site

I finished the commuter info page and weather advisories page.  The commuter page displays the Government operating status (a bigger deal in this area than you might think).  It also displays traffic information that comes from a feed provided by traffic.com.  I do a bit of parsing of that feed, as well as weeding out some of the information that doesn’t really affect traffic.  Then I sort the results by the traffic jam factor in descending order.  So bigger road blocks show up first in the list.

For the advisories page, I grab the latest advisories from the NWS, separate them into categories (watch, warning, advisory, statement…) and display them on the page.  I also display any warnings on the main page in orange, with a link to the advisories page.  I also moved over my links, webcam, and about pages.  I need to revise the about page, as some of the specifics about the weather station have changed since I first wrote that page.

I finished the weather statistics and did some clean up on the page display.  Some bugs may still surface, but it seems to be working fairly well so far.  It was a fair bit of work to rewrite my Java code in PHP.  It is getting easier as my PHP skills improve.  This is the first time I have programmed anything in PHP, so I still have a lot to learn.  The biggest stumbling block I have at the moment are my astronomical calculations.  It took me months and a a fair amount of testing to get that right in Java.  Not very anxious to repeat that in PHP.  I may do some Google searching and see what existing PHP code I can turn up.  Another option is to use the Java code to create an XML file with the results of the calculations in Java, and just use PHP to display them.  More work than I would like, but a lot less than converting my Java calculations to PHP.

I still have the humidity and solar sensors waiting for me to finish repairing, along with the fan aspirated solar radiation shield.  Then rewire the rain gauge for RJ45 rather than RJ11.  I need to get cracking.  The weather is getting colder, and I want to get the weather station back outside where it belongs.

Weather Forecasts

I wrote the PHP code to parse the weather forecast, and created the web pages to display it.  The forecast is in the form of an ATOM feed, and not too hard to parse, but it does have a few twists.  If I wanted to be lazy, there are some existing PHP scripts that get the weather forecast by screen scraping the NWS forecast page that I could download and use as a starting point.  I’m not a big fan of screen scraping, only because you are dependent on the provider not changing their HTML layout.  If they do change, you may have to make corresponding changes.  The feed is based on a documented interface, so it shouldn’t change, at least in theory.  This is just my preference for less maintenance.  I have no real issues with anybody using the screen scraping approach.

I’m continuing to add back the pages from my old ISP, clean them up a bit, and add a few new features.  Some of the pages don’t need much work to get them in shape.  The big ones remaining are the traffic page, webcam page, astronomy page, and the rest of the statistics page.  The web cam will probably wait until last, as I need to decide how I want to set up the cam and which computer I will use with it.  After I get bored of the Web site, I’ll go back to working on the hardware again.

Continue Building Web Site

The work on the Web site continues.  I built PHP scripts to parse my weather data, weather stats, and advisories so far.  Also updated and uploaded several of the pages for the site.  The big parts left to be done are the weather history and the weather forecast.  I don’t anticipate the forecast being particularly difficult, as the XML is fairly straightforward, and I have Java code to use as an example.  The history is a binary file, so I either have to convert it to XML on the Guruplug, or do it on the server.  I’ll probably write a custom program to run on the server so I don’t bog down the Guruplug.  Then do some debugging and revise the rest of the Web pages to use PHP.  I also need to update the “About” page to include all of the updates I’ve been making.

I purchased the remainder of the parts I need for the radiation shield.  I hope to find some time to solder on the new Humidity sensor and photocell.  I also need to make brackets to mount the fan and the humidity/temp board in the shield.  Then I can drill the final holes and have it ready to go.  I also have the parts to mount the anemometer on the weather station pole.  Lots of work lined up.  Just need to find some free time, and I could have it back in operation outside.

Plug Computer and Web Site

I’ve been continuing to test with the Guruplug.  The software and computer have been very stable.  However, with my weather application running, the load average is at just above 1, with occasional spikes that go higher.  This is OK, but doesn’t leave room for everything else I had been running on my old weather server.

For my old weather server, I had written a Java application that would run periodically using cron, and aggregate information from the weather station, the National Weather Service, and a couple of other sources.  It would then build a Web site using a template and all of the aggregated information.  Finally, the application would upload the Web site to my ISP every few minutes.  Based on the load average, the Guruplug probably wouldn’t be able to handle that extra processing.  So I chose to offload the data downloads and Web page creation to the server at my ISP.

I created a shell script to download all of the data feeds I needed and ran it as a cron job.  I also created a cron job on the Guruplug to upload my weather data to my ISP once a minute.  No problem so far.  I had planned to run my Web site builder Java application on the server at my ISP.  That is, until I learned that my ISP doesn’t really support Java applications.  They don’t prohibit them.  Just discourage their use.  So I looked at using PHP to dynamically build my Web site, which the ISP does support.

That approach will work fine, but requires a significant amount of work on my part to recreate in PHP everything I was previously doing using Java.  The two languages have some similarities, but enough differences to make for a fair bit of work.  I started out with the basic weather data, as that was the simplest structure to work with.  That conversion was fairly straightforward.  I then started working on the statistics.  That has turned into a lot of work as I have several hundred data fields to parse from the XML statistics file.  I also should have formed the XML differently to make it easier to process.  Lesson learned for next time I create an XML schema.

After I finish with the statistics, I still need to do the weather forecast, advisories, traffic reports, and a couple of others.  I also want to change my pages to have a shared file for the header, navigation bar, and footer.  So a lot of work is left to be done before the Web site is ready for prime time.

Parts Scavenging

Today I did some browsing at the local hardware store for some parts. Here’s what I found and how I plan to use them.  I’ll also show a part I had in my “inventory” just waiting for the opportunity to be used.

I found some small flower pots made from UV resistant plastic that will work well for my radiation shield.  They are a different shape from the plastic bowls I had used previously, but are very similar in size.  I’ll have a detailed explanation (with photos) of how I used them in a future post.  For now, here’s a picture.  I plan to paint it a lighter color once I find some suitable paint for use on plastic.  The hardware store had some, but not in a light enough color. The white plastic paint was out of stock.

Plastic Flower Pot

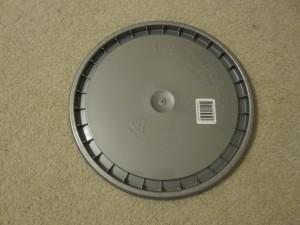
The next item I purchased was a plastic lid for a five gallon bucket.  It is very similar to what I currently use as a base for mounting my rain gauge.  Unfortunately it isn’t UV resistant, but at $1.28 US dollars, it was a steal.  I’m hoping it will last another 3 years, just like the first one I used.  I do plan to continue looking for a UV resistant flower pot base that will hold up better. But at least I know I have something I can use until I find something better. Here’s a picture.  I’ll provide more details and pictures when I finish making it into a rain gauge base.

Plastic Bucket Lid

Plastic Bucket Lid

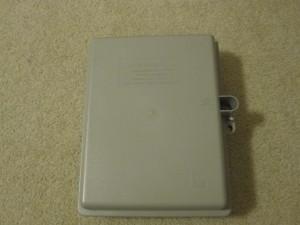
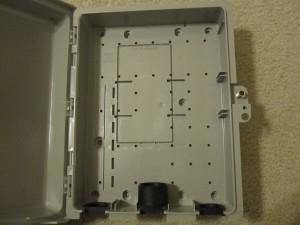
Finally, I had a UV resistant weatherproof plastic enclosure I purchased several months back.  These enclosures are typically used by cable and telephone companies, and hold up well.  I will use this to house the hub, anemometer board, and probably the barometer.  I need to mount the boards and drill some mounting holes.  I think it will work out really well. And yes, I did purchase this one. There isn’t some cable or phone company installation missing theirs.

Weatherproof Enclosure

Weatherproof Enclosure

Inside Weatherproof Enclosure

Inside Weatherproof Enclosure

I also connected the new lightning detector just to make sure it works correctly.  It is functionally identical to my old detector, so no software changes were required, other than adding the new address to my configuration file.  After making the changes and connecting the sensor, it worked without any problems.  I’ll put it in the housing I made for it when I’m ready to move everything outside.

New Anemometer

Today the new ADS anemometer arrived from Hobby Boards.  Here’s what was in the package
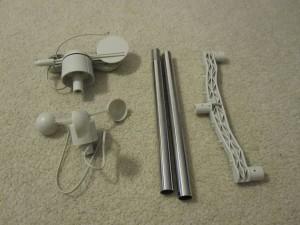
Anemometer Package Contents

I started out following the instructions to assemble it.  First put the pole together.
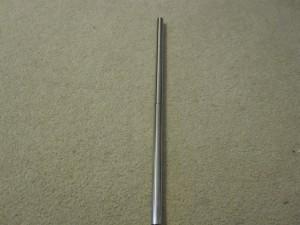
Assembled Pole

Assembled Pole

Next I installed the mounting arm.
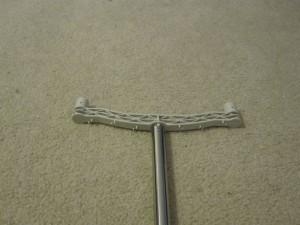
Mounting Arm Installed

Mounting Arm Installed

Then mount the anemometer and wind vane.
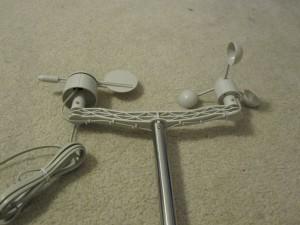
Sensors Mounted

Sensors Mounted

Then I added the controller board and connected the wires.  Or so I thought.  In my excitement I had stopped following the instructions.  I paid for that later on when I started testing.
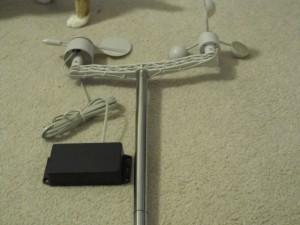
Completed Anemometer

Completed Anemometer

Next came time for some testing.  I hooked the anemometer board to my 1-Wire network and fired up the 1-Wire viewer application.  It showed the DS2423 and DS2438 chips from the anemometer board.  I updated the information in my application configuration file and started up the application.  Now the problems started.  The sensors would appear and disappear intermittently.  Sometimes the bus was shorted.  The anemometer board was intermittent.   Sensors would come and go.  This problem occured with both my application and the 1-Wire viewer.

I checked my power supply (this anemometer, my barometer, and the hub itself all require external power).  My voltmeter read right around 15 volts, which would meet the power requirements.  I removed all the other sensors and was able to isolate the problem as being with the anemometer board.  I finally decided to open the case for the anemometer, and I immediately saw my mistake.

If I had continued to follow the instructions I wouldn’t have had any problems, as they instructed me to open the case.  That’s where the jack is for connecting the sensors to the anemometer board.  I had connected the sensors directly to the 1-Wire bus.  This next picture clearly shows the third connector for the anemometer that isn’t visible until you open the case.  I want to stress that this was my mistake.  The instructions were clear on how to connect things (provided you read and follow them).
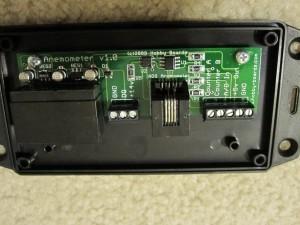
1-Wire Anemometer Board

1-Wire Anemometer Board

Now that I had everything wired up correctly, the board worked fine  My software updates to read the new sensors worked just as they should.  My only comment is that the wind direction sensor isn’t linear.  Directions such as NNE or ESE don’t cover as many degrees of rotation as the others.  In all fairness, the sensor only claims to have a resolution of 22.5 degrees.  And it probably does meet that specification.  For people who need greater accuracy than that Hobby Boards carries a higher quality sensor with a higher price tag to match.  This one will suit my needs.  Another plus is that this sensor doesn’t appear to have positions that are between directions and return an error like my old AAG anemometer would do.

Here’s some code for how to read the anemometer board and the ADS sensors.  A lot of this is specific to my application, but the basic logic should still make sense.  The formatting got messed up in moving the code to the Web.

Here’s code for the wind direction:

import com.dalsemi.onewire.OneWireException;
import com.dalsemi.onewire.adapter.DSPortAdapter;
import com.dalsemi.onewire.container.OneWireContainer26;

public class ADSWindDirectionSensor
{
    private static final int maxRetryCount = 3;
    private static final double WIND_DIR_ADJUST = 1.000;
    private OneWireContainer26 windDirectionDevice = null;

    public ADSWindDirectionSensor(DSPortAdapter adapter,
         SensorConfiguration config)
    {
        super(adapter, config);

        windDirectionDevice =
            new OneWireContainer26(adapter, config.getID());
    }

    public int getWindDirection()
    {
        int windDir = WIND_DIRECTION_ERROR;
        boolean bOK = false;
        int retryCount = 0;

        if (windDirectionDevice != null && isEnabled())
        {
            while(!bOK && retryCount < maxRetryCount)
            {
              try
              {
                if (this.isDebugFlag())
                {
                  ErrorLog.logError("Wind Dir: Device = " +
                    windDirectionDevice.getName() + "  ID = " +
                    windDirectionDevice.getAddressAsString());
                }

                this.getPath().open();

                // read 1-wire device's state
                byte[] state = windDirectionDevice.readDevice();

                // Read sensor's output voltage
                windDirectionDevice.doADConvert(
                    OneWireContainer26.CHANNEL_VAD, state);
                double Vad = windDirectionDevice.getADVoltage(
                    OneWireContainer26.CHANNEL_VAD, state);

                // Read the sensor's power supply voltage -
                //    mostly for debugging
                windDirectionDevice.doADConvert(
                           OneWireContainer26.CHANNEL_VDD, state);
                double Vdd = windDirectionDevice.getADVoltage(
                           OneWireContainer26.CHANNEL_VDD, state);

                // compensate for supply variations
                Vad = Vad * WIND_DIR_ADJUST;

                // convert the A to D voltage to a wind direction
                windDir = lookupWindDir(Vad);

                if (this.isDebugFlag())
                {
                  ErrorLog.logError("Wind Dir A to D = " + Vad +
                    " Wind Dir Supply = " + Vdd +
                    " Wind Direction  = " + windDir);
                }

                if (windDir == WIND_DIRECTION_ERROR)
                {
                  if (isDebugFlag())
                  {
                    ErrorLog.logError("Wind dir: ERROR - Vad: " +
                       Vad + " Vdd; " + Vdd);
                  }

                  retryCount++;
                }
                else
                {
                  bOK = true;  
                  if (isDebugFlag())
                  {
                    ErrorLog.logError("Wind dir: - Vad: " +
                      Vad + " Vdd; " + Vdd);
                  }
                }

            this.getPath().close();
        }
        catch (OneWireException e)
        {
            if (this.isDebugFlag())
            {
            ErrorLog.logError("Error Reading Wind Direction: " + e);
            }
            retryCount++;
        }
        }
        if (retryCount >= maxRetryCount)
        {
        ErrorLog.logError("Wind Direction: Retry count exceeded");
        }
    }

    return windDir;
    }

    // convert wind direction A to D results to direction value
    private int lookupWindDir(double volts) // ADS
    {
      int direction = WIND_DIRECTION_ERROR;

      for (int i = 0; i < 16; i++)
      {
      if((volts <= lookupTable[i] + 0.04) &&
                   (volts >= lookupTable[i] - 0.04))
      {
          direction = i;
          break;
      }
      }

      return direction;

    }

    static final double lookupTable[] =
    {
    2.69, // N
    6.52, // NNE 1
    5.99, // NE  2
    9.38, // ENE 3
    9.30, // E   4
    9.53, // ESE 5
    8.51, // SE  6
    9.01, // SSE 7
    7.60, // S   8
    7.98, // SSW 9
    4.31, // SW  10
    4.62, // WSW 11
    0.92, // W   12
    2.23, // WNW 13
    1.57, // NW  14
    3.57, // NNW 15
    };

}

Here’s the wind speed code:

import com.dalsemi.onewire.OneWireException;
import com.dalsemi.onewire.adapter.DSPortAdapter;
import com.dalsemi.onewire.container.OneWireContainer1D;

public class ADSWindSpeedSensor
{
    private OneWireContainer1D windSpeedDevice = null;
    private static final int maxRetryCount = 3;
    private long lastCount = 0;
    private long lastTicks = 0;

    /**
     *
     * Constructor that will instantiate the wind speed sensor
     * of the specified
     * ID on the specified adapter.
     *
     * @param adapter
     *            The 1-Wire adapter this sensor is connected to.
     * @param config
     *            The SensorConfiguration that specifies all the
     *            parameters for this sensor.
     *
     */
    public ADSWindSpeedSensor(DSPortAdapter adapter,
            SensorConfiguration config)
    {
    super(adapter, config);

    windSpeedDevice = new OneWireContainer1D(adapter, config.getID());
    }

    /**
     * Method to read the wind speed sensor and return the speed in 
     * miles per hour.
     *
     * @return The wind speed in miles per hour. If there was not a 
     *         valid reading, return Float.MIN_VALUE.
     *
     */
    public float getWindSpeed()
    {
    float windSpeed = Float.MIN_VALUE;
    boolean bOK = false;
    int retryCount = 0;

    if (windSpeedDevice != null && isEnabled())
    {
        while (!bOK && retryCount < maxRetryCount)
        {
        try
        {
            this.getPath().open();

            if (this.isDebugFlag())
            {
            ErrorLog.logError("ADS Wind Speed: Device = " +
                      windSpeedDevice.getName() +
                      " ID = " + windSpeedDevice.getAddressAsString());
            }

            // read wind counter & system time
            long currentCount = windSpeedDevice.readCounter(15);
            long currentTicks = System.currentTimeMillis();

            if (lastTicks != 0)
            {
            // calculate the wind speed in MPH based on
            //  the revolutions per second
            windSpeed = (float) ((1.25 *(currentCount-lastCount)) /
                 ((currentTicks-lastTicks) / 1000f));
            }

            if (this.isDebugFlag())
            {
            ErrorLog.logError("Count = " + (currentCount-lastCount)
                    + " during " +
                (currentTicks-lastTicks) + "ms calcs to " + windSpeed);
            }

            // remember count & time
            lastCount = currentCount;
            lastTicks = currentTicks;
            bOK = true;

            this.getPath().close();
        }
        catch (OneWireException e)
        {
            if (this.isDebugFlag())
            {
            ErrorLog.logError("Error Reading Wind Speed: " + e);
            }
            retryCount++;
        }

        }

        if (retryCount >= maxRetryCount)
        {
        ErrorLog.logError("Wind Speed: Retry count exceeded");
        }
    }

    return windSpeed;
    }

}

Time for some more testing, and create a way to attach this anemometer to the rest of the weather station.  I also received a new photocell and a new lightning sensor to play with.  I need to replace my humidity sensor chip and build the new radiation shield.  Lot’s more fun to come.

Computer Switchover

I ran a 2 day test running the application continuously, to make sure the software was stable on my workstation with the DS9490.  I had been having some problems with the DS9097 connected through an inexpensive USB to serial converter.  After running for a while, the software would lose communication with the DS9097 adapter.  I attributed the problems to the converter, as the software has been running successfully for years, while the converter is brand new.  I had heard rumors that converters using the FTDI chip are more stable than the ones using the Prolific chip, but I have no hard evidence to substantiate that claim.  This converter uses the Prolific chip, but was what I had available and was inexpensive.  I really didn’t think I would see any significant problems with it.  Switching to the DS9490 cleared up the periodic loss of communication with the adapter.

So now I’m switching to the Guruplug to host my application, initially using the DS9097 and USB to serial converter.  I’m hoping the Linux drivers are better then the Windows ones.  I’ll look at switching to the DS9490 adapter later.  I installed all the libraries I needed, including getting RXTX setup.  The permissions on /dev/ttyUSB0 caused me to do some debugging, as I kept getting a message saying that RXTX wasn’t configured correctly.  Turned out to be a simple permissions problem. When udev detects the USB to serial converter, it creates the /dev/ttyUSB0 device with root permissions. Set the permissions using chmod and all is well for now. I still need to create a udev rule to set the permissions when it detects the USB to serial converter and creates the corresponding device.  But permissions are set for now.

I installed the application and am running it in test mode.  So far so good.  It’s kind of sluggish compared to my workstation, but it does find all the sensors and can read them.  I’ll leave it running for a few days and see how stable it is.

I also got an email from Hobby Boards confirming the shipment of my new anemometer and the assorted repair parts.  Should have plenty to do this weekend after all my new goodies arrive. Still need some replacement UV resistant plastic parts. Got some flower pots for the radiation shield that are made from UV resistant plastic. Will be posting about that project soon. I also need to return to the garden center and look for a few more plastic goodies, as well as any new PVC fittings I may need to mount the anemometer.

Update: After running for two days with no issues or lockups I think I can declare the new combination stable.  The load bounced around more than I would like, with the 1 minute average going up and down from .4 to as high as 1.5. But the 5 minute average managed to stay below 1.  Might be related to garbage collection, but I haven’t investigated at all yet so I’m just guessing at this point.  I may want to do some JVM tuning down the road, but it should be OK for now.