Stability

The weather station has been running for several days with the modified FARS.  So far the temperature is looking good, with no spike in temperature when the sun shines directly on the housing.  The temperatutre at night dips well below the CWOP/MADIS analysis like it did before.  The temperature in the daytime still reads higher than the analysis, but a second thermometer located in a different area of the yard confirms the readings. 

For the Webcam, I have been trying out a software package known as Conquercam.  It has also been running for several days with no problems or lockups.  It doesn’t have support for streaming, but I’m simulating that via some Ajax code.  Not quite as good as I want, but stability is more important than streamng.

My Ajax-ification of the Web site is coming along well.  I’ve completed most of the pages, with the stats page still outstanding.  I’ve completed about one third of the page, and have a pattern for adding Ajax support that isn’t hard to implement.  So I should be able to complete that page this weekend.

So what’s left to do?  I need to add a ground wire for the lightning sensor.  I also need to revise the “About” page and bring it up to date.  Then I can go to my “nice to have” list, which has quite a few items on it.  There are some fun projects on there, like setting up a weather satellite receiver.  Since another of my hobbies is amateur radio, I’m looking forward to that one, even if the technology and concept are a bit dated.

Temperature Fix and More Ajax

I’ve been monitoring the temperature reported by my station, and feel like it may be reading too high.  In the past, my reported temperature was frequently flagged by CWOP as being below the analysis value, typically at night.  I had checked it with another temperature sensor in the same location and the two had agreed,  This led me to the conclusion that I had a micro-climate in my back yard.  I presented my information on the weather quality mailing list and the experts there came to the same conclusion.

Temperatures with my revised FARS tended to read high in the day and as expected by the analysis at night.  Since this was different than what I had experienced in the past using the same sensor I began to suspect the readings I was getting.  CWOP even flagged me once or twice for possible solar heating.  But that was on days that were very overcast with no direct sunlight.  So I wasn’t totally convinced of the solar heating theory.

I had problems in the past with the voltage regulator on the sensor board causing some slight heating.  But I remedied that by moving the temperature sensor off of the board.  I began to suspect the fan I was using.  The new power supply was feeding it 20 VDC and it was spinning pretty fast due to the extra voltage.  I also didn’t feel much air exiting the FARS, although air was certainly being drawn in.  My theory was that the fan met with enough air resistance to heat it up due to insufficient exit air flow, and the air heated up by the fan was backing up over the temperature sensor.  So I drilled some new vents in the FARS to help the air escape.  Maybe this weekend I’ll add a resistor to slow down the fan as well.  But for now I will be keeping an eye on the temperature readings to see if this change had any effect.

I’ve also done some more work making the Web pages dynamic using AJAX.  I came up with a simple way to supply the data as XML by creating a new PHP page that returns the data needed to update the pages as an XML document.  Everything is calculated and formatted using my existing PHP code, converted to XML, and returned to the AJAX code via XMLHTTP calls.  The JavaScript code just has to extract the data it needs from the XML document and fill in the blanks on the Web page.  Simple enough, but a lot of tedious work to code the XML data for all the fields and to write the JavaScript code to fill in all of the fields on the Web pages.  But I’m making progress, and have some fields filled in dynamically on each page.  That will take me the better part of this week to complete, depending on how energetic I feel.  But I have a plan of attack that works.  Just need to do the grunt work now.

Ajax Updates

I started working on adding support for Ajax updates to the Web site.  This allows the Web pages to update themselves without refreshing the entire page.  I started with the main page, and only updating the basics: temperature, humidity, pressure, wind speed, and wind direction.  So far it appears to be working well.  It requests new weather data every 10 seconds or so.  The weather station software only uploads the weather information once per minute, so the Web page doesn’t get new data more often than that.  So I need to change the interval for uploading weather data to the Web site.  Then I can work on making the Ajax code more general and use it on all of the Web pages.

I’ve also been looking at some CSS templates in an effort to make the Web site look a little more attractive.  Up till now the focus has been on getting everything working.  There may still be a few bugs in the calculations waiting to be found, as I probably missed something in my move from Java to PHP.  But I feel like I can put some time into aesthetics at this point.  Moving to a new template will be quite a bit of work.  But hopefully the outcome will be worth the effort.

Web Cam and Data Quality

I’ve tried out several more Web cam software packages.  Without naming names, some lock up after running for a while, and one even crashed almost instantly.  I probably could have gotten them to work better by granting admin privileges or running them in compatibility mode.  But for now, ConquerCam seems to be my best choice.  It’s been running for several days without a hiccup so far.  It doesn’t offer streaming, so I created an almost streaming Web page that refreshes once per second.  I may work on it some more, but didn’t want to invest a lot of effort for a software package I may not decide to keep.

I’ve been keeping an eye on my data quality reports at CWOP, and it looks pretty good.  I’m still not convinced my temperature sensor is accurate.  I may have a solar heating problem, but I’m not sure yet.  I’m also experimenting to see if my fan is causing some heating due to restrictive airflow in the FARS.  I may add some holes to reduce any restriction and to keep the fan from warming up.  I may also add a resistor to slow the fan down some.

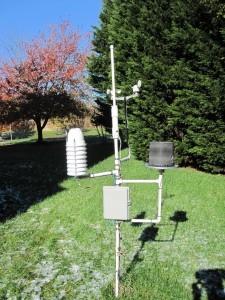
For anybody who is curious, here is a picture of the weather station.  I still need to run a ground wire for the lightning sensor.  Always something to tinker around with.  I’ve also added some Ajax code to the Web site to refresh of the weather data without reloading the entire page.  A lot more to come in that department as I’m just doing some prototyping for now to see how well it works.

Completed Weather Station

Completed Weather Station

Web Cam Anyone?

I’ve played around with a weather Web cam in the past, but none of the free software packages worked out for me.  I looked into writing my own software, and even got something started, but never followed through and completed it.  I may still come back to it one day, but I wanted to get something that worked now.

I have a Logitech QuickCam Pro for Notebooks that I’ve been happy with.  The picture quality is good enough for this purpose.  The only software I was happy with were commercial packages, but I decided to experiment with the free software again.  I saw that Yawcam had been updated recently, so I downloaded the latest version.  When I had tried Yawcam in the past, it would run for a day or so and then completely lock up, requiring me to shut down and restart the software.  I’m giving it another try to see if it still has that issue or not.

I taped the camera to an upper story window on the front of my house with a view of the horizon.  I installed the software and set it up to upload an image to my Web site using FTP once per minute.  I may change the interval, but for now that works.  I also set up the software to act as a streaming server.  Opening this URL in my browser brought up a moving image from the Web cam.  So now I had it working on my local network.  Time to move on to the Internet.

I already had Web pages for the Web cam on my weather Web site, so I just updated them to point to my home server.  I have a domain at DynDNS of cloppermill.dyndns.org, so I used that.  I set up firewall rules to permit traffic on the streaming port and to route it to the computer with the Web cam attached.  Just like that I had a streaming Web cam set up.

I may still tweak some things.  I’m not sure I’m happy with the camera position yet.  The default Web page for the streaming server could use some sprucing up.  I could add some time lapse movies, historical pictures, and even submit my Web cam URL to Weather Underground.  But first I have to see if the software is stable or not.  I won’t find that out until after I leave it running for a few days.

Update: The Yawcam software exhibited the same behavior as before.  The text it overlays on the image is updating but the image itself hasn’t changed for hours.  It successfully updates the Web site and I can still connect to the streaming server, but the image is still the old image with the updated date and time overlay.  Looks like I need to explore some other software packages to see what will work for me.

Got Power?

I stopped off at another Radio Shack store and was able to purchase the 2.1mm power connector I needed to make the power adapter cable for my hub.  I soldered it up and went outside to connect everything up.  After that I ran some quick diagnostics and everything was looking good.  So I started the weather station back up and watched the logs for errors.  Unfortunately I started seeing consistent errors showing up for the wind direction sensor.  I turned on debugging and saw that I was able to read values from the sensor, but the voltages I was reading weren’t quite within range.  At first I played around with the gain and offset settings in the configuration, but the error wasn’t a linear offset.  I may have been able to come up with a formula for compensating, but since it had worked fine with the extension cord and power supply I began to suspect something was wrong with the power to the station.

There are a few handy features I incorporated into my software that I took advantage of here.  First is a setting in the configuration file that allows me to turn debug logging on and off on a per sensor basis.  This is a fairly common practice and I’ll probably enhance it to add some log4j style debug levels some time in the future.  The other handy feature is that the station software monitors the configuration file, and if it is updated while the station is running, the station will read the updated configuration file and use the new settings.  So I don’t have to continually stop and start the software when making configuration changes or debugging.  Just edit the file and give the software a moment to read the new configuration settings.

I did some research and saw that the recommended voltage for the anemometer I was using is 14-24VDC.  My power supply was only 12VDC.  I looked at the one I had used temporarily and it was 14VDC.  Looks like the voltage is below the required voltage for the anemometer.  I searched through my bag of wall warts (literally a big bag filled with them) and found an old computer power supply for a laptop that was rated 20VDC.  So I hooked that one up in place of the 12V wall wart.  My barometer is located indoors and uses a separate power supply.  That supply is rated at 12VDC.  I also replaced that supply with the 14V one I had used for testing.  I wasn’t seeing errors from the barometer, but it specifies a supply voltage of 14VDC, so I swapped supplies just to be sure.

Now when I fired up the weather station the logs showed no errors.  I enabled the data uploads to CWOP and Weather Underground and I can see my data on both of their Web sites.  I compared my data with some neighboring weather stations and everything looks good at the moment. I need to let it run for a few days and see how the analysis of my data on the CWOP site looks after things have settled down a bit.

Outside At Last

I finally got all the sensors mounted on the station pole and wired up.  I mounted the weatherproof box and installed the anemometer board and hub inside it.  I ran all the wiring and I dressed and secured it with wire ties.  Then I ran a test over several days with the station inside to make sure it all still worked as expected.  That test went well, with no errors reported by the software.  I’m finally ready to move everything outside.

I pounded my outside mounting pole farther into the ground, as it had become loose, making sure it was vertically straight,  Then I clamped the weather station pole to the ground mounted pole.  So far so good.  Time to wire it up.

Looking everything over, the network cable was still intact.  The power cable to run 12V DC to the sensors was cut.  The ground rod was still intact (it’s inserted about 4 feet into the ground and would be hard to remove) but the ground wire from the station was cut as well.  I spliced the cut in the power wiring, and made a Y adapter out of Anderson Power Poles to split the power between the hub and the fan.  I had a spare Power Pole to 2.1mm adapter cable, but the 2.1mm connector was too short for the jack on the hub.  A trip to the local Radio Shack was pointless, as they were out of stock on the connector I needed.

As a test, I temporarily ran an extension cable to the back yard and plugged in the power supply I had been using indoors.  Then I moved the Guruplug and other assorted hardware to the new location in my basement.  After starting up the computer I saw that everything was working fine.  No errors reported in the log, and my Web site is being updated as it should be.

I’ll need to disconnect things until I get the 2.1mm connector I need and make an adapter cable.  I still need to make an adapter cable for the fan as well, but at least I have the parts I need for that.  Then I will run a ground for the lightning detector, orient the wind vane to North, and lock the wind vane into position.  Just a little bit of work left to do and this weather station will be back on the air.

Update: I enabled the upload of my weather data to the Citizen’s Weather Observer Program (CWOP) as they do some analysis and error checking based on the data collected from the NWS and other nearby stations.  For the short time the statiom was running my data analysis looks good as well.

A Quick Update

Just wanted to post a quick update.  I have everything mounted on the station pole and in the weatherproof housing.  I’ve applied caulk, liquid electrical tape, and silicone grease everywhere I can.  I still need to dress the wiring and make everything look nice and neat.  Then I will test the entire assembly to make sure all the connections are good.  Once it passes that test I can move to working outside.

I already have the 1-wire network connection outside.  I just need to clean up the RJ-45 some.  The power cord I had run previously most likely needs replacement.  The ground wire for the lightning sensor needs to be replaced as well.  But I have plenty of spare wire, connectors, and solder, so I’m not expecting major challenges in that department.

I found some time for a few more minor software corrections.  I now display dates for all of the XML feeds so I know how current they are.  I also fixed a bug in the moon rise and set code I was using.  I tried to take the easy way out and use some open source code I found rather than converting my tried and true Java code to PHP.  But the code I downloaded didn’t account for daylight savings time.  It dealt with time zones, so I don’t know why DST was omitted.  But one easy fix and it appears to be working correctly now based on my comparisons with the information published by the Navy on their Web site.  Finally, I made some changes to the CSS code so that it works better with IE.

Hopefully I’ll be able to finish up the outside installation this weekend.  I’m almost ready to put this weather station back in operation after more than a month of rework.  Then I can spend the winter revising the software and Web site as much as I want.

Starting Install

There have been a lot of distractions lately, but I’ve managed to get some more work done.  The weather’s been nice, and I wanted to get things finished up this weekend so I can make adjustments while it isn’t too miserable outside.  Hopefully the good weather will hold out a little while longer since I didn’t get as far along as I had hoped.

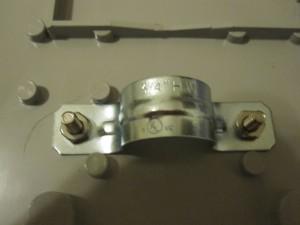
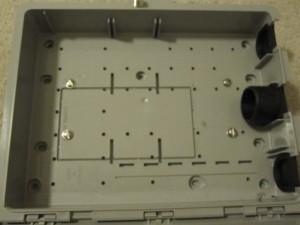
I purchased some conduit clamps and stainless steel hardware for mounting the weatherproof housing on to the station mast.  That worked out well, and all I needed to do was to drill some small holes in the housing.  The following pictures show the clamps and how I mounted them.  So now the box is mounted on the pole.
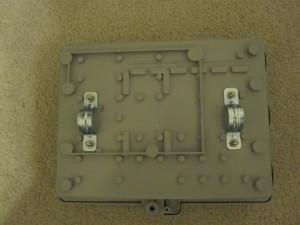
Mounting Clamps
Mounting Clamps

Mounting Clamp Close Up
Mounting Clamp Close Up

Mounting Clamp Inside

Mounting Clamp Inside

I hadn’t yet created a way to mount my solar sensor in the fan aspirated radiation shield.  All I did was drill some holes for mounting screws and for the photo diode to protrude slightly out of the top of the FARS.  I also applied some liquid electrical tape to the board as weatherproofing.  I plan to seal around all of the holes I drilled with some caulk to make sure it doesn’t leak.

I finished up the rain gauge.  I found the original wiring with an RJ-45 connector which I reinstalled, replacing the RJ-11 wiring I currently had on the gauge.  Then I screwed the gauge down to the base I had created, and installed the hat that fits over the top of the gauge.  So now the rain gauge is ready to be installed on the weather station mast.

I fitted the anemometer to the mount I made.  I installed the mount on the station mast with the stainless steel clamps I had for it.  Then I put the anemometer on the mast.  I would like it to fit just a bit tighter, so I’ll probably install a screw or wrap a shim of some kind around the anemometer pole.  I also applied some silicon grease to the connectors to waterproof them.  I’ll have to revisit this install and devise a way to keep it from turning on the base.

I also started a couple of other pieces.  I applied liquid electrical tape to the 1-Wire hub prior to installation in it’s case.  As soon as the liquid dries, I plan to install it in the case and then in the waterproof housing.  I also started fitting the lightning sensor to its’ housing.  I wasn’t sure if it would fit, as the new lightning sensor is not the same size as the one I removed.  I installed the antenna and slipped the sensor into the housing.  It looks like that will fit with no problems.

I did spend a little more time with the software.  There was bug in the PHP code for the historical rain data.  It always showed as zero.  It turned out I just needed to cast the values to float prior to doing math with them.  I had the correct values, just as strings.  When I tried to subtract them I always ended up with an answer of zero.  Just for fun, I also changed some of the radar pictures to animated ones.  I’ll most likely tweak that page some more over the winter when it’s too cold to work on the outside hardware.  I also want to come up with a more attractive logo for the site.  My artistic talents are sorely lacking, but I may give it a go sometime soon.  Maybe even have something that changes automatically based on the weather conditions or the season.  We’ll see where that one ends up.

Back To Hardware (Again)

Today I went back to work on the hardware, and was able to also sneak in some work on the software.  I built the mount for the anemometer, the base for the rain gauge, and waterproofed the temp/humidity and solar gauges.  The waterproofing involved painting the boards with liquid electrical tape.  Not very high tech, and doesn’t look pretty, but it seems to work well.

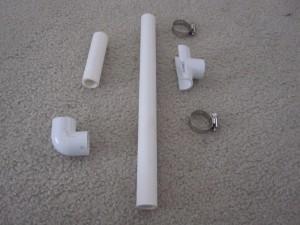
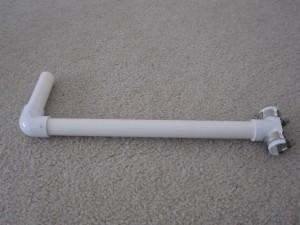
The anemometer base was very simple to make.  I used some PVC tubing, a 90 degree elbow, a T fitting, and some stainless steel clamps.  I cut off part of the T fitting so that it can be clamped on to the weather station mast.  These pictures show the finished product..

Anemometer Base - Parts

Anemometer Base - Parts

Anemometer Base - Assembled

Anemometer Base - Assembled

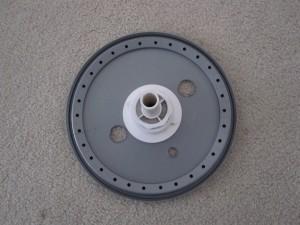
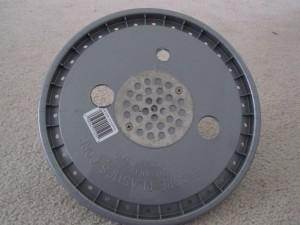
The rain gauge base is made from a weird assortment of parts and fittings.  The main base is a paint can lid.  The center mount is made up of a shower drain, PVC adapters, and a short piece of PVC tubing.  Then I drilled holes for the water to drain and for the cables to reach the gauge, which will be mounted on top of the base.  The next pictures show how it fits together.

Rain Gauge Base - Bottom

Rain Gauge Base - Bottom

Rain Gauge Base - Top

Rain Gauge Base - Top

As far as the software goes, I translated my calculations for the equinoxes and solstices from Java to PHP and incorporated them into the astronomy page.  I did some clean up of the existing pages, header, and footer, and added links to validate the HTML and CSS for each page.  I also started adding some error checking, just so I can get familiar with doing that in PHP.  A lot more to come in that area, as parsing XML files definitely leaves room for errors to occur.